Pages

Saturday, November 12, 2011

Holiday Shopping Extravaganza in Sonoma County!


Update: I had a blast this day meeting everyone! Thanks to all that stopped by my table to chat and check out all the a muse studio goodies!

Hello! It's been a while since I've posted on my blog but I've been in hiding in my crafting studio working behind the scenes preparing for two craft shows!

Next Sunday (Nov. 20th), I will have an exciting a • muse | studio table set up locally in Windsor along with other home-based vendors for a super fun Holiday Shopping Extravaganza! How convenient is that to get most of your holiday shopping done in one spot? Think of the time you will save!

Each vendor will be offering a one-day special promo. I'll have a door prize drawing at my table and a fun make-and take project. Also, if you have your kids in tow, there will be a coloring station for them!

If you will be in the area or know someone that lives in town, please swing by to say hi and see many a • muse | studio products up close. They are so much better in person than in the catalog or online!

Here are the details:

Holiday Shopping Extravaganza!

Date: Sunday, November 20th

Time: 10:00 am – 3:00 pm

Place: Hauth’s Taekwondo Center (across from the Agatha Furth Center)
8465 Old Redwood Highway, Ste. 230
Windsor, CA

Admission: Free!

List of Vendors
A Muse Studio (yippeee…that's me!)
Avon
Become Beauty
Gold Valley Parties
Handmade by Kat
Just 4 Fun
Kristen's Boutique Bags and Charming Accessories
Mary Kay
Pampered Chef
Partylite
Premier Jewelry
Silpada
Stampin' Up!
Sweet Rose Desserts
Tastefully Simple
Tupperware
Willow House


I hope to see some familiar faces and new ones too!  Bring a friend or two along as well...there will be some yummy treats to snack on and light refreshments!

Monday, September 19, 2011

September Spotlight Special!

An Elegant Halloween Bash!

Be sure to click on the "September Spotlight Special" tab at the top of my blog to find out more about this month's Spotlight Special of discounted stamps sets and 'Jack-O-Lantern' assorted cardstock!


There are so many fun projects you can make for Halloween!

If you'd like to order any of the supplies to make these projects for your Halloween party, shop online at my website or e-mail me!

Monday, August 22, 2011

A*MUSE*A*PALOOZA and Holiday Catalog and Inspiration Guide


Today is the start of a fun and exciting six-week event across the country where stamps, cardstock, adhesive, glitter, and anything else craft related will be flying around everywhere!

What happens during this time, you wonder? Well...if you book a workshop with me anytime between August 22nd to September 29th, you will can earn a free exclusive hostess stamp set called Family Favorites (available only during Amuseapalooza), receive more free fabulous products than you already get with our current hostess benefits, and make projects using brand new products from the new Holiday Catalog and Inspiration Guide that just so happens to be available today as well!


Products available from Aug. 22nd - Jan. 31st

This catalog is loaded with brand new stamps set for Halloween, Christmas, and Valentine's Day along with other fun accessories! Also, there are so many new and fresh ideas that will inspire you to make projects for the upcoming holidays!

Too Cute To Spook stamp set of 20, pg. 5

This is just one of the cute stamp set in the catalog that I love! The images and sentiments are sized just perfect for making fun Halloween treats! How cute are those bats?!

Stay tuned all week on this blog for projects I make using this stamp set and other stuff from the Holiday Catalog!

To hop on board the exciting A*MUSE*A*PALOOZA choo choo train and host a card party with your friends, send me an e-mail and I'll make sure to reserve a seat with your name on it!

If you'd like your very own copy of the Holiday Catalog and Inspiration Guide, send me an e-mail as well!

Sunday, August 7, 2011

Birthday Stash of Craft Goodies!

This is gonna be a long post! I have lots to share on a fun pre-birthday day I had when I was at Paper Garden in Sacramento a few weeks back. I was there again to take a colored pencil class taught by Dave Brethauer from Memory Box Co. I've taken this particular class a few times now and I always learn something new every time! I was lucky to have taken the class again with my crafty bud, Wanda Guess. We always have so much fun chatting the class away!

Usually Dave travels solo to different stamp stores to teach but this year, he brought his whole family on tour across the U.S.!

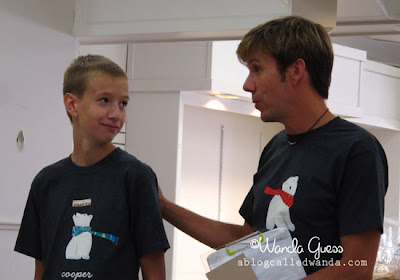
Dave and Cooper Brethauer
(photo courtesy of Wanda G.)

Dave's son Cooper was his assistant and they both had custom polar bear t-shirts made with them names on it...so cute!

(photo by Wanda G.)

Here's a pic of me concentrating hard on coloring this bird image. I'm showing a bunch of Wanda's pics because she's always good about snapping shots and her pics are so much better anyway! Using colored pencils is so different from using Copic markers. You have to use the lightest touch at time while laying down the color on the paper. Other times, you are coloring hard to burnish the color in. It takes a lot of practice! 

After class, Wanda surprised me with a cute little kraft box containing this yummy cupcake...

(photo by Wanda G.)

It's a delicious Lemon cupcake from a local cupcakery called Esther's in Sacramento. I think their cupcakes are by far the best ones I've ever ever had! The cake batter is so dense and they are just sweet enough along with the frosting. Oh.so.yum-my!

Wanda gave me my present early and said I could open it before my birthday while we were at dinner. 


Oh my goodness...boy was I spoiled when I opened the box because all these adorable craft goodies were in there! It's always a hazard when a crafter gives another crafter a stash of craft goods because you just don't know if they already have them. Wanda somehow guessed right because I didn't have any of that! 


Here's a close-up of the birthday card she gave me. How elegant and beautiful is this card she made me?! I love the pattern paper and that cute pink pin on top of the butterfly. Check out Wanda's post on her blog for more details on how she made the card.


I really love the stamp I got from Wanda. It's so pretty and vintagey! I had to use it to make her a thank you card.


The stamp image is so pretty on its own, I didn't want to do too much with it so I tried to keep it simple. I was inspired by a card Julie Ebersole, Director of Education for a•muse | studio, made recently and posted on her blog, Paper Trufflez

For the background, I used Bristol paper to create a watercolor effect. I took a bunch of Tombow water-based markers in a•muse | studio colors and scribbled each color directly onto a big acrylic block. At first, I tried to use the Tombow Colorless Blender marker to pick up the colors from the acrylic but it wasn't wet enough to color onto surface and ended up pilling the paper. I had better luck using the medium water brush pen instead. I had better control of how much water I could squirt onto the tip. After I finished painting on the colors, I brushed over the whole area with just water. I really like how it turned out. It's just enough to give a soft yet effective background.

I stamped the image with black ink and took my handy Sakura Quickie Glue pen and outlined some of the glass bottle and some of the flower petals so I could pour Diamond Glitter all over it! It's hard to tell in the pics but it's so much more sparkly in person! I used a Stamp-a-ma-jig to position the image in the right spot. This is a must-have tool for every stamper!


You can't see it, but I used Orange Polka Dot cardstock for the card base. Inside the card, I cut a quarter sheet of Orange Gingham cardstock and stamped the image in Orange pigment ink.

I made a frame using the Labels Eight Nestabilities die for the background and image with Orange Gingham cardstock again because Wanda loves gingham pattern!

In keeping with the delicate look of the card, I used a strip of vellum and stamped the sentiment using Staz-On ink.

To finish of the card, I added some Onyx Twinkle Stickers in the middle of the flower and made a bow with Polka Dot Organdy ribbon.

I hope you made it to the end of this post! Thanks for hanging in there with me! Have a great start of this week! Summer has sure flown by, hasn't it?

On the Wing stamp set
Medium Water Brush
Stamp-a-ma-jig stamp positioner


Card Supplies:
Stamps: Sentiment from On the Wing
Ink: Orange pigment ink (a muse studio), Staz-On Jet Black, Brilliance Graphite Black
Paper: Orange Gingham, Orange Polka Dot, Bristol Pad, Vellum (cardstock weight)
Accessories: 1/4" Orange Polka Dot Organdy ribbon, Onyx Twinkle Stickers, Bermuda Pearl Stickers, 
Tools: Assorted Tombow Markers, Labels Eight Nestabilities die, Stamp-a-ma-jig, Tonic 8 1/2" Guillotine paper trimmer
Miscellaneous: Tombow Adhesive Dots Tape Runner, Foam Dimensionals

Friday, August 5, 2011

Picnic Basket Seatbelt Purse and Card

Last weekend, I celebrated a super fun birthday in San Francisco with my family. We went to Chintatown to have yummy dim sum and hung out around the city.

A few days before my actual birthday, a package arrived at my doorstep from my sister...


It's a Harvey's Picnic Basket Seatbelt Tote!!! OMG these bags are the coolest things on the market in my opinion. The bags are constructed from real seatbelt material that is very durable. I have a couple of other ones in solid colors and they are so fun to tote around!

This particular tote is a new one that Harvey's came out with that has a wicker picnic basket pattern. It gets better when you check this out...


The inside is lined with red gingham! OH SNAP!!! How adorable is THAT?! I can't stand it! This of course is my most favorite bag in my collection now! If you've never heard of Harvey's, be sure to check out their website because they have some seriously adorable bags. I'm a huge fan!

So, back to the cute thank you card I had to make for my sister...


I was so inspired by the bag she gave me that I made a basket weave tote using Papaya and French Roast stitched grosgrain ribbon. I cut a piece of cardstock (1.50 x 2.00") and used super stick tape on the back. I covered one side with ribbon strips side by side and then wove more strips to make a basket weave. I love how it turned out!

Did you notice the felt heart on there? It's a new a•muse | studio die called Heart Trio die from the new Holiday catalog and the red felt is a brand new product in there too! The felt is a wool/rayon blend and the dies cut through it like butter.


I used foam dimensionals to pop the tote up from the background. Then, I used some red gingham cardstock to tie it all in and top it off with 1/4" Cherry stitched grosgrain ribbon.


For the inside, I stamped the inside of the card using a vintage wood-mounted AMuse stamp called Tiny Hearts. 

I can't wait to get this card sent off to my sister...I think she'll like it!

Thanks for stopping by and stay tuned for another thank you card I made for my friend Wanda G.!

Have a great weekend!

If you are interested in ordering any a•muse | studio products I used, you can order them directly from my a•muse | studio webstore. If you'd like a peek at the new Holiday catalog, send me an e-mail and I'll send you a PDF file!

Card Supplies:
Stamps: Sentiment from "Just my type", Vintage Tiny Hearts stamps from A Muse (no longer available)
Ink: a|s Cherry pigment ink pad
Cardstock: Cherry Gingham, Cranberry Solid, Kraft
Accessories: Red Felt, 1/4" Stitched Grosgrain Ribbon (Cherry, Papaya, French Roast), Red Hearts Twinkle Stickers, foam dimensionals, super stick tape, Tombow Adhesive Dots Runner
Tools: a|s Hearts Trio Custom Die, 8 1/2" Tonic Guillotine paper trimmer, Scallop Circles Nestabilities,
Miscellaneous: 2 1/2" circle punch

Friday, July 22, 2011

A Muse Studio 2011 Holiday Catalog!!!

Spiderwebs...Reindeers...Hearts...oh my!!! I was floored when I got a chance to peek at our new Holiday Catalog! You will be amazed at all the cute stuff we have in store for Halloween, Christmas, and Valentine's...oy!


All the items along with the printed catalog will be available for purchase on August 22, 2011. But if you can't wait and want to take a peek inside the catalog, e-mail me and I will forward you a PDF right away! You will be speechless!

Stay tuned for more exciting news about the upcoming 2011 A*Muse*A*Palooza! More fun and incentives for booking a workshop during that event!

Thursday, June 23, 2011

Taylored Expressions Blast from the Past Blog Hop

Happy Thursday! Today I'm participating in a blog hop hosted by Taylored Expressions. The theme was "Old Glory" and we had to use the patriotic color combination of red, white, and blue. This was our sketch inspiration by Sankari Wegman:


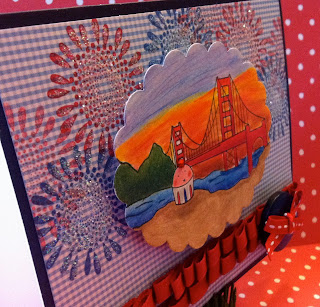
When I signed up for this challenge, I immediately knew I wanted to use the Cuppie in San Francisco image along with some fireworks. This is the card I came up with:


If you can believe it, I colored the main image with my Prismacolor colored pencils! I know...shocking for those of you who know me because my coloring weapon of choice is usually Copic markers. The only part I used one color of Copic marker is for the sand area. The base is colored with E31 Brick Beige and I went over the shadows with a sandy brown colored pencil.

I didn't want to leave the background of the image white so my husband suggested coloring a sunset. That was a challenge! I'd never done a sunset before so I hope it turned out okay! I found a picture of a sunset online as a reference.


For the ruffled ribbon effect, I took two strips of super sticky Scor-Tape and made ribbon pleats on top and then used tiny glue dots to keep the ruffles down. I like how that turned out!

I found a flower sunburst stamp from A Muse Studio that I though mimicked fireworks so I stamped that in red and blue ink. Then, I took my handy Sakura Glue pen and "colored" each petal and pour yummy A Muse Studio Diamond Glitter all over it! Sooo sparkly!!!

Usually it's a rare occasion to have a clear skies when fireworks go off in San Francisco. Most of the time we see colored fog!  Hee hee!

I'm so fortunate to live so close to the Golden Gate Bridge and admire it's beauty in person every time I get the craving to get some good Dim Sum in the city!

Please check out all the creations of the other participants and have a super day!


Friday, June 10, 2011

Butterfly Kissed with Polka Dot Stamp Card

Happy Friday!!! The sun has finally decided to grace Sonoma County again...yay! The weather has been perfect in the evenings to walk to our downtown and stop into the local frozen yogurt shop for dessert after dinner time. I hope this summer time weather is here to stay for a while!

I'm back with another A Muse Studio Consultant Challenge that Julie Ebersole, Director of Education, has given all us consultants. We were to choose a background stamp and "kiss" it with a solid stamp image. If you are not familiar with this simple yet stunning technique, check out the video Julie made on it. It'll be so much cooler when I can ever figure out how to embed a YouTube video directly into my post!


I used a solid butterfly image and made sure I inked it up with even coverage with Blackberry ink. Then I pressed ("kissed") it evenly against the uninked medium polka background stamp. I think it made such a pretty effect, don't you agree? 


I took a purple Koh-I-Nor colored pencil and shaded along the outside of the butterfly wings for added dimension and contrast. Then, I put teeny tiny pink twinkle stickers in the center of the polka dots. Gotta add a little sparkle ya know!

'Just Because' Stamp Set

'Polka Dot Patterns' Stamp Set


For the green floral bouquet, I used an image from a pretty botanical set. I stamped it three times with Grass ink to create a fuller image. Have the stamps that are cling-mounted gives you so much flexibility in manipulating the stem to stay straight or to curve it. I love it! Then, I randomly put tiny Lime Pearl stickers for dimension. I also used a green Koh-I-Nor pencil and shaded the bottom parts near the stems.

'Beautiful Botanicals' Stamp Set


For the sentiment, I also used the same Blackberry ink as the butterfly but I "stamped it off" once on a scrap paper so I would get a lighter shade. I did that so it would give a softer look and wouldn't compete with the butterfly image. To finish the card off, I busted out my shimmery pearlescent chalks and edged along the sides in a blue-green color.

'Wild Rose' Stamp Set

Shimmer Pearlescent Chalk Set

Usually, when I make a card, I pretty much have a layout in mind and can picture how the card will turn out. For this challenge, I only had a picture of the image I wanted to use which was the butterfly with polka dots and the rest just fell into place. I love when that happens! 

Thanks so much for stopping by and I hope you have a fabulous weekend!

Card supplies:
(All products used can be ordered directly through my A Muse Studio Web Store)
Stamp sets: Just Because, Polka Dot Patterns, Beautiful Botanicals, Wild Rose 
Cardstock: Kraft
Ink: Grass Pigment, Blackberry Pigment
Accessories: Lime Pearl Stickers, Micro Dot Twinkle Stickers (Asst.), Shell Twine, Pebbles, Inc. Shimmer Pearlescent Chalks, Koh-I-Nor Colored Pencils
Tools: A Muse Studio Clear Acrylic Blocks, Scissors

Monday, May 23, 2011

Butterfly Hello Recessed Window Card

Hello! Yikes, it's been a while...hasn't it? I somehow went on a blog hiatus that was completely unintentional on my part. The last couple of months have been crazy busy for me and I am happy to be back in my blog corner!

I'm squeezing in this card for a challenge that A Muse Studio issued to all its Creative Consultants. We were to create a recessed window card and post it.


Lately, I've been into all things woodgrain so the A Muse Studio Woodgrain Background stamp came in really handy! I love how the woodgrain pattern lines have a modern feel to it...don't you think?


First, I cut a 4 in. x 5.25 in. piece of kraft cardstock and rounded two of the corners using the Corner Chomper.  I inked up the woodgrain background stamp with Grass ink. Then, I placed the piece of cardstock on top of the inked stamp and placed another piece of scrap cardstock over it and pressed it into the stamp. This is a little trick for getting an evenly inked image on your cardstock piece. You just have to be careful to lift the cardstock up directly.

I cut the butterfly window using the largest Butterfly die from the Butterfly Trio set of dies. I decided it needed some antennae and just drawing them on wasn't going to do so of course I had to use some Bermuda pearl stickers to give it some pizazz! I think it did the trick! Then, I outlined the butterfly cut out by piercing holes around it to give it an added finish.


For the card base, I used Bubblegum solid cardstock and cut a small piece of Bermuda cardstock to put underneath the cut out window. Before adhering the layered kraft piece with dimensional foam, I placed it onto the card base and stamped the 'hello' word from the 'Just My Type' stamp set right in the middle.  I then finished off the card with some luxurious Bubblegum satin ribbon.


I really love how this card turned out! I'm gonna have to make some more with other color combinations! Thanks for stopping by and I will try not to be gone for soooo long! Stay tuned shortly for more creations using woodgrain...I've got a few things I've been experimenting with!

If you are not familiar with the technique of creating a recessed window card, check out the YouTube video Julie Ebersole, A Muse Studio Director of Education, made on it: Recessed Window Card

If you are interested in ordering any of the products I used from A Muse Studio, send me an e-mail or you can order directly from my A Muse Studio website!

Card supplies:
(All products used are available from A Muse Studio unless otherwise noted)
Stamp sets: Woodgrain Background, Just My Type 
Cardstock: Kraft, Bubblegum Solid, Bermuda Solid
Ink: Grass Pigment, Onyx Black Versafine (Tsukineko)
Accessories: Bermuda Pearl Stickers, Bubblegum Satin Ribbon, 3D Foam Adhesive
Tools: Butterfly Trio Dies set, Corner Chomper, Paper Piercer/Stylus

Friday, April 1, 2011

Shop for A Muse Studio products online with Tina!

My A Muse | Studio personal shopping website is now open for business! Woo hoo! Just wanted check in super fast and let you know that you can shop online anytime especially when you get that urge for a midnight crafty snack!

With the launch of A Muse Studio at the beginning of March, I have been soooo busy behind the scenes that I have been neglecting my blog! Don't fret because I will be back soon with some projects to show you! I've been busy preparing for my big launch gathering this Saturday and I will post pics of the cards I made for my celebration!

In the meantime, please head on over to my a|s website and browse through all the yummy A Muse Studio goodness online! Let me know what you think of it!

Sunday, March 6, 2011

Extra, extra! a•muse|studio catalog is here!

If you haven't seen the brand new A Muse Studio catalog yet, check it out! There's so much fun stuff to look at!


'The Perfect Blend' stamp set, page 61

All the stamp sets are rubber cling-mounted (except for the alphabet sets which are clear) come in a clear DVD case with the stamp images indexed on the front cover...so convenient!

This set has 15 stamps!

When you open the DVD case, you will see a white paper backing around the stamps. You just peel that part off and stick the whole rubber sheet to the inside of the case. Each stamp is individually die cut and the foam backing has the stamp image printed right on it. The "excess" rubber was intentionally left around the stamps so that you know where to put the stamp back after you use it...genius! All you need to get going are your a•muse | studio clear acrylic blocks to mount your stamps on and you are ready to roll! It's a no-fuss experience giving you more time to get crafty!

After checking out the catalog online and you're thinking you have to have a copy of the "real" catalog to look through, don't hesitate to send me an e-mail! I'll get one in the mail for you ASAP!

Have fun and stay tuned for more!


Tuesday, March 1, 2011

a muse | studio...did you hear the news?!!!

I have so much to share...I don't even know where to begin...

Today is the start of a brand spankin' new whirlwind crafty adventure I am beginning with a muse | studio!


I've signed on as an Independent Creative Consultant with the company...

and this is an understatement, but I am soooo super excited, ecstatic, jumping up-and-down like a school girl, rockstar head-banging, running around the neighborhood, hyper giddy about the whole enchilada!

So what does this all mean, you dare ask? Well, I get to share my love and passion for crafting with you in the comfort of your own home, my home, online, in blogland, and on cloud nine!


This is just a little bit of what you get in your starter kit when you join...look at all that yummy goodness! Some of the colors are called Bubblegum, Blackberry, and Lemon Whip!


All the stamp set come as rubber cling mount in a handy stamp indexed DVD case. This cute set is called Friends Fur-ever! I fell in love with this set the first time I laid eyes on it...how can you not love it?!


I made this card with all my a muse | studio goodies. How stinkin' cute is that Bubblegum pink skunk?

Be sure to check back often because I have tons to share about my new crafty adventure!

To find more about a muse | studio or to join my Kraftin' Muses team, drop me an e-mail anytime at tina@teadub.com 

Happy Tuesday!

Thursday, February 24, 2011

For A Special Teacher - Taylored Expressions February Blast from the Past Blog Hop

Welcome new and old friends! Thanks for stopping in and checking out my creation for the blog hop hosted by Taylored Expressions! The creative focus was "Going Green" and we were to create a card using the color green or incorporate a recycled element in our project. I followed this sketch they provided:


Here's the card I came up with:


I wanted to make a card that celebrates all the super wonderful teachers out there and I thought the Teacher Desk Cuppie stamp was perfect for it! My starting point was with the pretty green and blue pattern paper I selected from Cosmo Cricket for the background...don't you think it's pretty? I paper-pieced some that paper for the desk as well.

Then, I used a bunch of my Copic Spica glitter pens and colored all the accessories on the desktop with it. Gotta love all that sparkle! I ran into a little snag trying to find a red pearl to add to Cuppie's head but then I remembered I had some white pearls on my desk and used a dark red Copic to color the surface of the pearl...perfect!

I hope you enjoyed my creation for the hop and have fun checking out the rest!

LinkWithin

Related Posts with Thumbnails