Usually Dave travels solo to different stamp stores to teach but this year, he brought his whole family on tour across the U.S.!

Dave and Cooper Brethauer
(photo courtesy of Wanda G.)
Dave's son Cooper was his assistant and they both had custom polar bear t-shirts made with them names on it...so cute!

(photo by Wanda G.)
Here's a pic of me concentrating hard on coloring this bird image. I'm showing a bunch of Wanda's pics because she's always good about snapping shots and her pics are so much better anyway! Using colored pencils is so different from using Copic markers. You have to use the lightest touch at time while laying down the color on the paper. Other times, you are coloring hard to burnish the color in. It takes a lot of practice!
After class, Wanda surprised me with a cute little kraft box containing this yummy cupcake...

(photo by Wanda G.)
It's a delicious Lemon cupcake from a local cupcakery called Esther's in Sacramento. I think their cupcakes are by far the best ones I've ever ever had! The cake batter is so dense and they are just sweet enough along with the frosting. Oh.so.yum-my!
Wanda gave me my present early and said I could open it before my birthday while we were at dinner.

Oh my goodness...boy was I spoiled when I opened the box because all these adorable craft goodies were in there! It's always a hazard when a crafter gives another crafter a stash of craft goods because you just don't know if they already have them. Wanda somehow guessed right because I didn't have any of that!
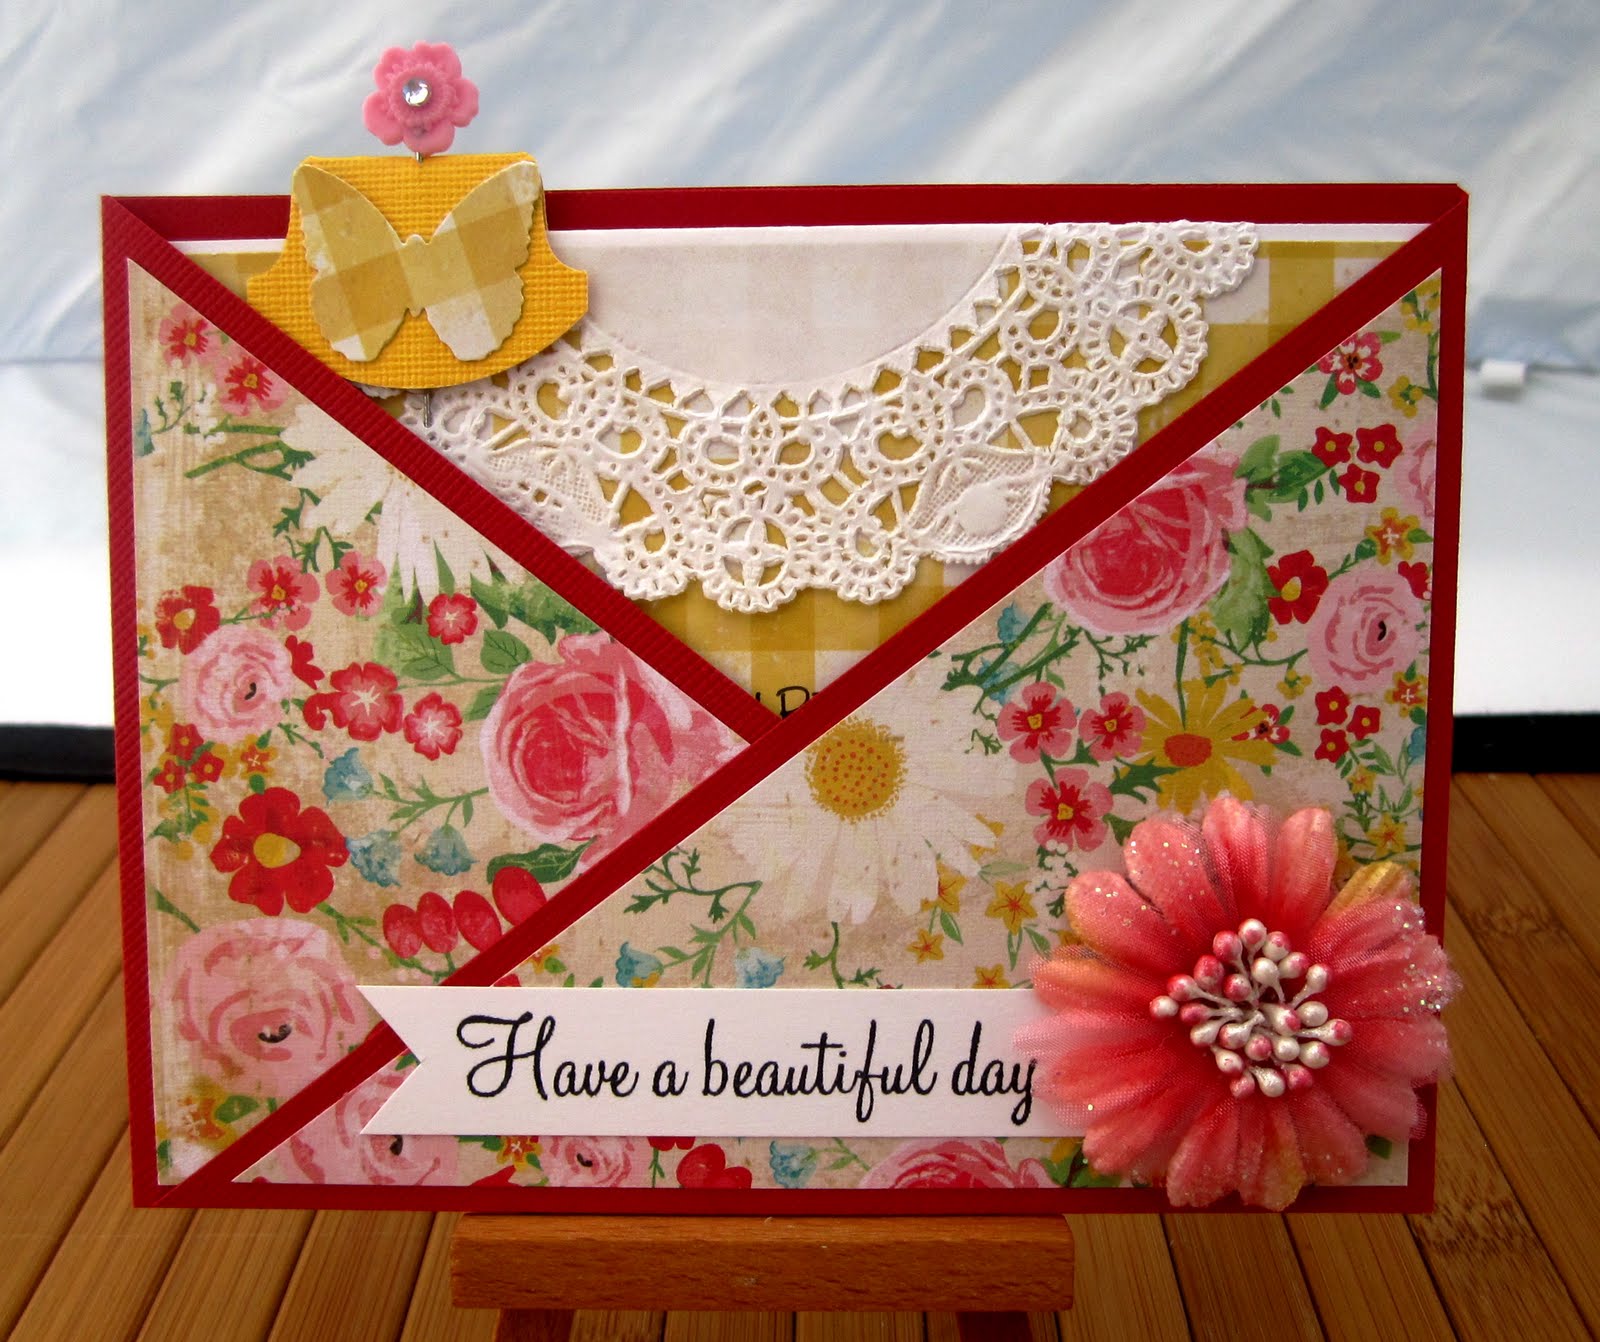
Here's a close-up of the birthday card she gave me. How elegant and beautiful is this card she made me?! I love the pattern paper and that cute pink pin on top of the butterfly. Check out Wanda's post on her blog for more details on how she made the card.

I really love the stamp I got from Wanda. It's so pretty and vintagey! I had to use it to make her a thank you card.

The stamp image is so pretty on its own, I didn't want to do too much with it so I tried to keep it simple. I was inspired by a card Julie Ebersole, Director of Education for a•muse | studio, made recently and posted on her blog, Paper Trufflez.
For the background, I used Bristol paper to create a watercolor effect. I took a bunch of Tombow water-based markers in a•muse | studio colors and scribbled each color directly onto a big acrylic block. At first, I tried to use the Tombow Colorless Blender marker to pick up the colors from the acrylic but it wasn't wet enough to color onto surface and ended up pilling the paper. I had better luck using the medium water brush pen instead. I had better control of how much water I could squirt onto the tip. After I finished painting on the colors, I brushed over the whole area with just water. I really like how it turned out. It's just enough to give a soft yet effective background.
I stamped the image with black ink and took my handy Sakura Quickie Glue pen and outlined some of the glass bottle and some of the flower petals so I could pour Diamond Glitter all over it! It's hard to tell in the pics but it's so much more sparkly in person! I used a Stamp-a-ma-jig to position the image in the right spot. This is a must-have tool for every stamper!

You can't see it, but I used Orange Polka Dot cardstock for the card base. Inside the card, I cut a quarter sheet of Orange Gingham cardstock and stamped the image in Orange pigment ink.
I made a frame using the Labels Eight Nestabilities die for the background and image with Orange Gingham cardstock again because Wanda loves gingham pattern!
In keeping with the delicate look of the card, I used a strip of vellum and stamped the sentiment using Staz-On ink.
To finish of the card, I added some Onyx Twinkle Stickers in the middle of the flower and made a bow with Polka Dot Organdy ribbon.
I hope you made it to the end of this post! Thanks for hanging in there with me! Have a great start of this week! Summer has sure flown by, hasn't it?

On the Wing stamp set

Medium Water Brush

Stamp-a-ma-jig stamp positioner
Card Supplies:
Stamps: Sentiment from On the WingInk: Orange pigment ink (a muse studio), Staz-On Jet Black, Brilliance Graphite Black
Paper: Orange Gingham, Orange Polka Dot, Bristol Pad, Vellum (cardstock weight)
Accessories: 1/4" Orange Polka Dot Organdy ribbon, Onyx Twinkle Stickers, Bermuda Pearl Stickers,
Tools: Assorted Tombow Markers, Labels Eight Nestabilities die, Stamp-a-ma-jig, Tonic 8 1/2" Guillotine paper trimmer
Miscellaneous: Tombow Adhesive Dots Tape Runner, Foam Dimensionals
YAY! What a nice post! And...a lovely card! I love the frame effect (in gingham no less) and the background shading...awesome!
ReplyDeleteHey, YOU!!! {{{{{{Tina}}}}}}} WOW! This really dazzles! I love the background technique you used--really does make that focal image POP! And, I LOVE the vellum band overlaid like this with the sentiment! BEAUTY!!!
ReplyDelete