Pages

Showing posts with label Colored Pencils. Show all posts

Thursday, June 23, 2011

Taylored Expressions Blast from the Past Blog Hop

Happy Thursday! Today I'm participating in a blog hop hosted by Taylored Expressions. The theme was "Old Glory" and we had to use the patriotic color combination of red, white, and blue. This was our sketch inspiration by Sankari Wegman:


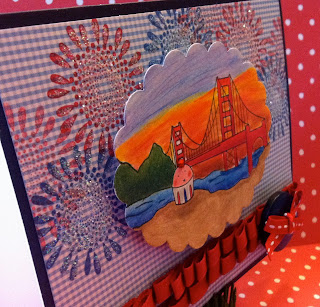
When I signed up for this challenge, I immediately knew I wanted to use the Cuppie in San Francisco image along with some fireworks. This is the card I came up with:


If you can believe it, I colored the main image with my Prismacolor colored pencils! I know...shocking for those of you who know me because my coloring weapon of choice is usually Copic markers. The only part I used one color of Copic marker is for the sand area. The base is colored with E31 Brick Beige and I went over the shadows with a sandy brown colored pencil.

I didn't want to leave the background of the image white so my husband suggested coloring a sunset. That was a challenge! I'd never done a sunset before so I hope it turned out okay! I found a picture of a sunset online as a reference.


For the ruffled ribbon effect, I took two strips of super sticky Scor-Tape and made ribbon pleats on top and then used tiny glue dots to keep the ruffles down. I like how that turned out!

I found a flower sunburst stamp from A Muse Studio that I though mimicked fireworks so I stamped that in red and blue ink. Then, I took my handy Sakura Glue pen and "colored" each petal and pour yummy A Muse Studio Diamond Glitter all over it! Sooo sparkly!!!

Usually it's a rare occasion to have a clear skies when fireworks go off in San Francisco. Most of the time we see colored fog!  Hee hee!

I'm so fortunate to live so close to the Golden Gate Bridge and admire it's beauty in person every time I get the craving to get some good Dim Sum in the city!

Please check out all the creations of the other participants and have a super day!


Friday, June 10, 2011

Butterfly Kissed with Polka Dot Stamp Card

Happy Friday!!! The sun has finally decided to grace Sonoma County again...yay! The weather has been perfect in the evenings to walk to our downtown and stop into the local frozen yogurt shop for dessert after dinner time. I hope this summer time weather is here to stay for a while!

I'm back with another A Muse Studio Consultant Challenge that Julie Ebersole, Director of Education, has given all us consultants. We were to choose a background stamp and "kiss" it with a solid stamp image. If you are not familiar with this simple yet stunning technique, check out the video Julie made on it. It'll be so much cooler when I can ever figure out how to embed a YouTube video directly into my post!


I used a solid butterfly image and made sure I inked it up with even coverage with Blackberry ink. Then I pressed ("kissed") it evenly against the uninked medium polka background stamp. I think it made such a pretty effect, don't you agree? 


I took a purple Koh-I-Nor colored pencil and shaded along the outside of the butterfly wings for added dimension and contrast. Then, I put teeny tiny pink twinkle stickers in the center of the polka dots. Gotta add a little sparkle ya know!

'Just Because' Stamp Set

'Polka Dot Patterns' Stamp Set


For the green floral bouquet, I used an image from a pretty botanical set. I stamped it three times with Grass ink to create a fuller image. Have the stamps that are cling-mounted gives you so much flexibility in manipulating the stem to stay straight or to curve it. I love it! Then, I randomly put tiny Lime Pearl stickers for dimension. I also used a green Koh-I-Nor pencil and shaded the bottom parts near the stems.

'Beautiful Botanicals' Stamp Set


For the sentiment, I also used the same Blackberry ink as the butterfly but I "stamped it off" once on a scrap paper so I would get a lighter shade. I did that so it would give a softer look and wouldn't compete with the butterfly image. To finish the card off, I busted out my shimmery pearlescent chalks and edged along the sides in a blue-green color.

'Wild Rose' Stamp Set

Shimmer Pearlescent Chalk Set

Usually, when I make a card, I pretty much have a layout in mind and can picture how the card will turn out. For this challenge, I only had a picture of the image I wanted to use which was the butterfly with polka dots and the rest just fell into place. I love when that happens! 

Thanks so much for stopping by and I hope you have a fabulous weekend!

Card supplies:
(All products used can be ordered directly through my A Muse Studio Web Store)
Stamp sets: Just Because, Polka Dot Patterns, Beautiful Botanicals, Wild Rose 
Cardstock: Kraft
Ink: Grass Pigment, Blackberry Pigment
Accessories: Lime Pearl Stickers, Micro Dot Twinkle Stickers (Asst.), Shell Twine, Pebbles, Inc. Shimmer Pearlescent Chalks, Koh-I-Nor Colored Pencils
Tools: A Muse Studio Clear Acrylic Blocks, Scissors

Tuesday, August 17, 2010

Super fun day with Dave Brethauer of Memory Box Co.!

Oh my goodness...I had such a great day at Paper Garden on Saturday taking a colored pencil class with Dave Brethauer (owner of Memory Box) and with my friend Wanda G! Although we have separately taken this class with Dave in the past, we always learn some new technique in refining our coloring skills.

Wanda, Dave and me!

If you ever get the opportunity to take any of Dave's classes, I highly recommend it!  He has so much patience and always stops at each table to demo each technique first hand. Dave travels to various stamp stores all over the States and shares his talent with all who want to learn about colored pencils and water coloring techniques.

Aren't those three birds wearing hats the cutest?!

I took this pic when I was supposed to be paying attention...oops!

These are the five cards we made during class that Wanda colored and took a pic of.

Wanda snuck a pic of me concentrating on coloring the hats on the birds. We used Prismacolor pencils. Oooh...the coolest technique we learned was to take the small end of a stylus (dry debossing) and making designs like stripes or dots on the hats before lightly coloring over the area. We thought it was so genius!

Here's Wanda goofin' off before class started. She's gonna give me a hard time for showing this!

Pic courtesy of Wanda G.
Here are some more card samples from the other class that Dave taught. I love the polar bear in the snow globe easel card...so sparkly! 

After class, Wanda and I went to lunch at a restaurant called Lemongrass in Sacramento and had such a yummy meal!  We saved room for dessert of course and we each had the most delicious coconut ice cream topped with chocolate sauce (for me) and caramel sauce (for Wanda). Oh, it was soooo good!

I hope you enjoyed checking out all the pics of my fun crafting day!

LinkWithin

Related Posts with Thumbnails