Pages

Showing posts with label Stampin' Up. Show all posts

Sunday, February 13, 2011

Poppy Stamps Valentine's Day Card

Happy Sunday! I can't believe tomorrow is Valentine's Day already...wh-AT?! What are you doing to celebrate tomorrow? Or have you celebrated already over the weekend!


I made this card for my friend Stephanie last year. I think it turned sooo sweet, don't ya think?   Valentine's Day is my second most favorite holiday of the year (Christmas being first) because I LOVE hearts, red and pink!

How about that cute image in the heart center? Isn't she adorable? Her name is Peggy Polka Dot from Poppy Stamps. I colored her in with my Copic markers. I used a tiny heart stamp from A Muse and randomly stamped it in red and pink chalk ink for the background.


To make the grass on the inside of the card, I took two shades of green (dark and light) Copic Sketch markers and "flicked" blades of grass using the brush tip end. The tree stamp is by Memory Box. It is a two-part stamp where the tree part is one stamp and on the end of wood block, is a teeny tiny stamp of there tiny hearts for the leaves...I absolutely adore it! You can kinda go crazy repeatedly stamping heart leaves all over the branches like I did! 

For added interest, I stamped a trail of leaves on the part of the card where I wrote a message.

Hope you enjoyed this card and have a super duper day!

Supplies:
Stamps: Peggy Polka Dot, Heart Tree (Memory Box), Sentiment (Savvy)
Cardstock: Kraft card base (PTI), Gingham and Polka Dot (A Muse), White (Neenah Solar White)
Ink: Colorbox Fluid Chalk
Accessories: Twinkle Stickers (A Muse), Ribbon (SU!), Heart border punch (Martha Stewart)

Tuesday, December 7, 2010

Rag Quilt Tote for Barbara

This was my first ever sewing project! Without any prior experience, I decided to take the plunge and made this rag quilt tote bag for Barbara two days before gathering with our friends for her birthday dinner. It turned out being not so bad for a newbie sewer! I didn't get too frustrated with the construction of the tote.


I found these three pretty coordinating fabric patterns at a local fabric shop. I don't remember who manufactures it. They were sold in half yard pieces in a basket so it was easy to pick ones that looked nice together. 

This style of tote is modeled after the traditional rag quilts that people have made. Usually, the unsewn edges are snipped and you run it through the washing machine to get a raggedy-edge look.

It was all straight stitching for the main tote part using my Janome Sew Mini. This machine is so cute...it's not a full-sized one and it's just a tiny bit smaller that a sheet of paper! 


It won't sew through denim but works fine for lighter weight fabrics. When I got to the part where I had to attach the nylon webbing straps, I got some help from my Mom using her full size Singer sewing machine.

I went on YouTube and found different tutorials on how to construct this tote. Using the Stampin' Up! Square Scallop Die made by Sizzix made it so easy to cut the fabric pieces. You need at least a 5-inch square of fabric and you can run eight lightweight layers of fabric through the machine at a time. 

I sandwiched a 3 1/4 in square of batting between two pieces of fabric and sewed and "x" on each square. I used 27 squares (54 total) for the tote.


When I was done with all the sewing, I went and snipped in-between each of the scallops so they would fray in the wash. I didn't a get chance to put it through the washing machine so when I gave the tote to Barb, I told her she could either leave it the way it was or she could run it through her washer to get a more ragged look.


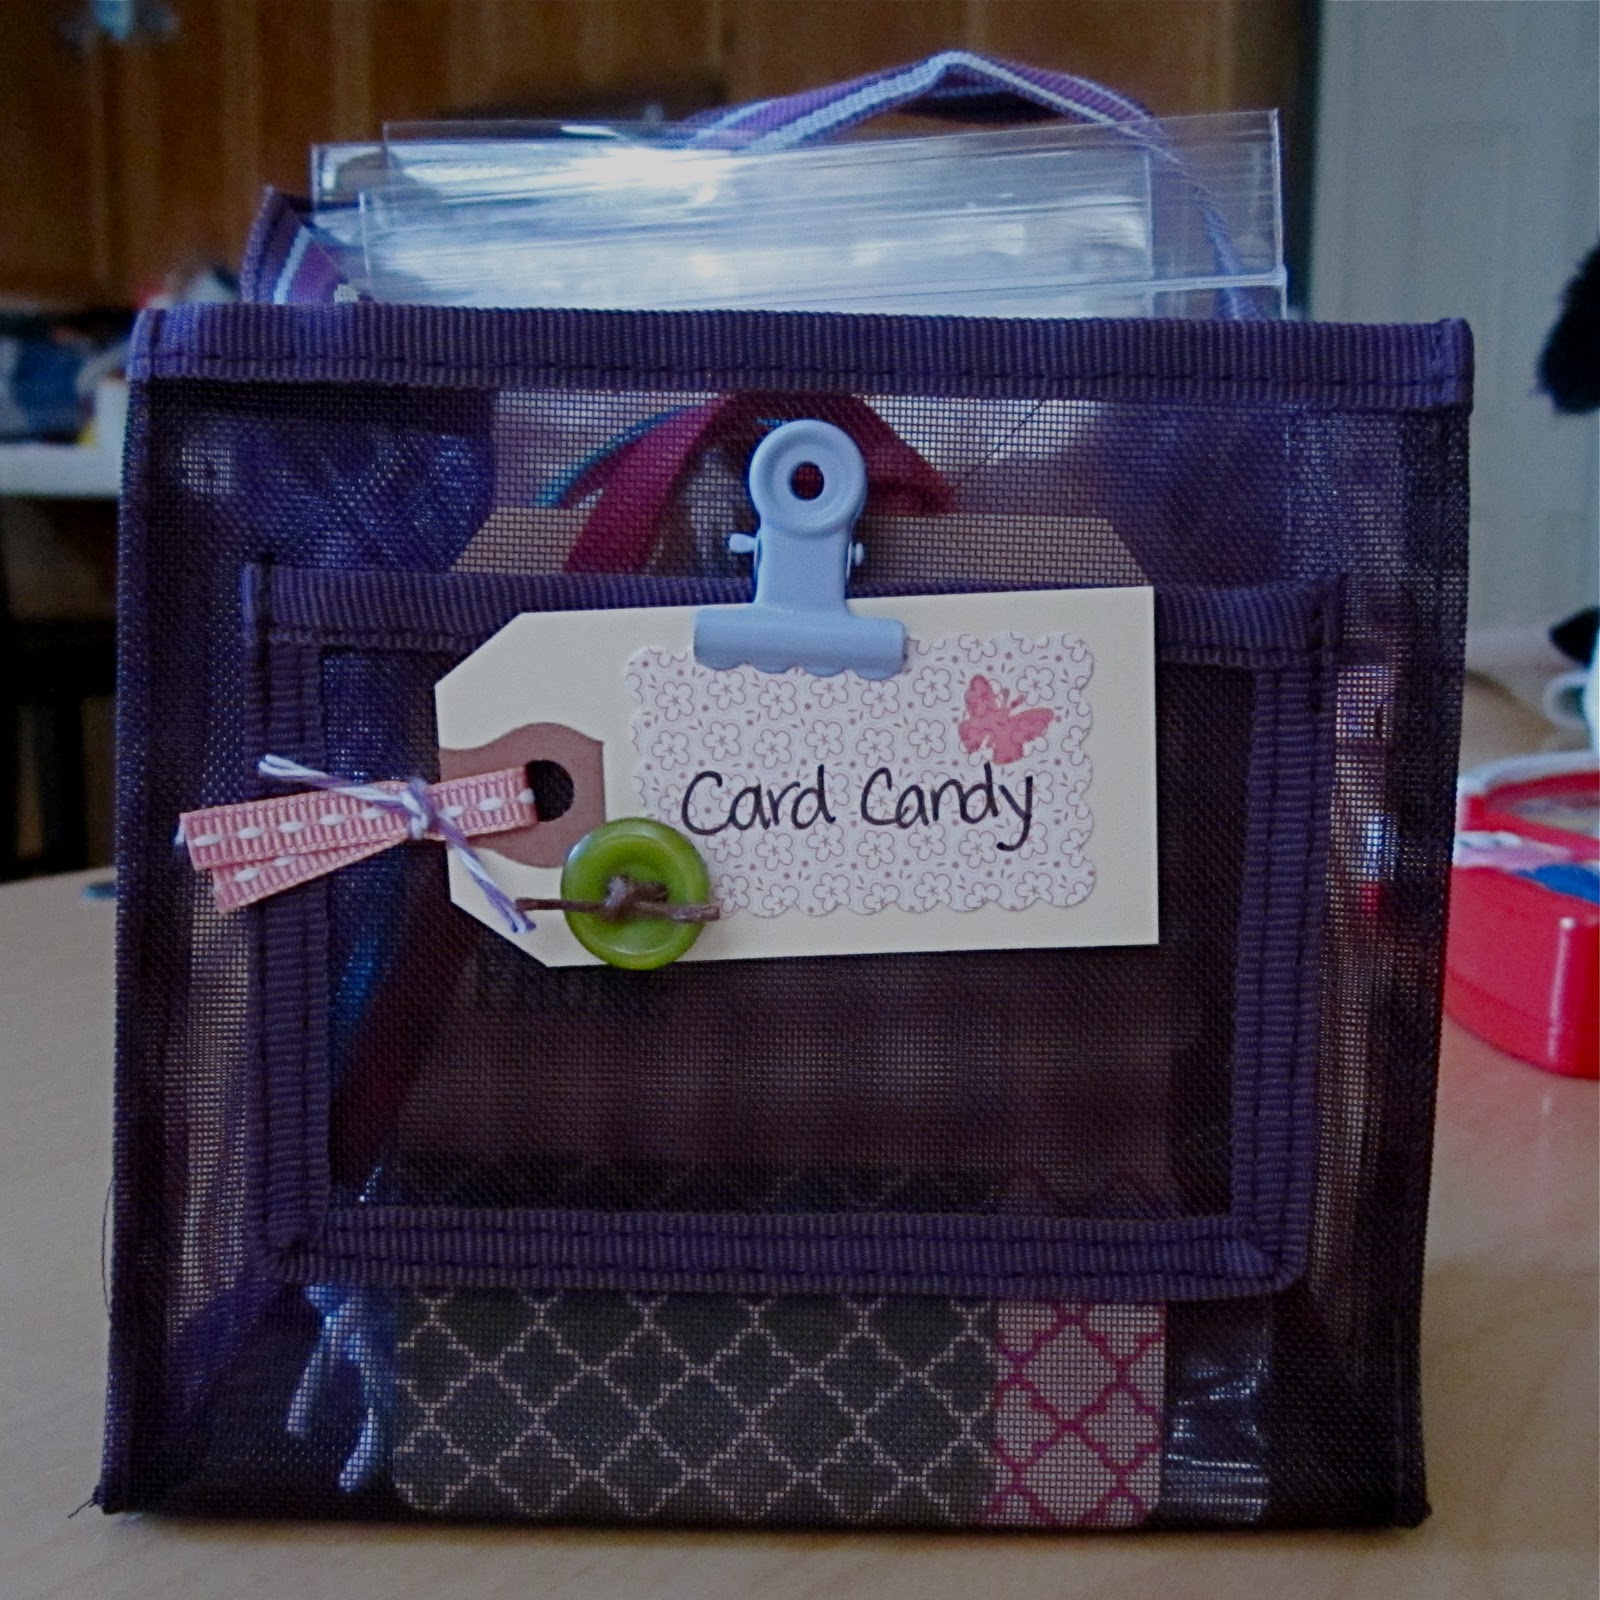
Of course I had to put a little something inside the tote so I put together a little goodie bag of various card candy for Barb to use since she is also a card maker. The purple mesh tote is something I bought through Creative Memories.


I shopped through my craft desk and found some fun supplies like blank shipping tags, twine from The Twinery, some mailing labels, assorted Papertrey Ink buttons, and some punched butterfly embellies. I also made some gift tags using some background stamps by Savvy Stamps.


This is a pic of Barb and our other crafty friend Maria with the green tote in the background at Scrapbook Expo in Sacramento the first week of November. It was Barb's first time ever attending the Expo and she had a blast. Both Maria and I warned her that she might get a overwhelmed with so many craft goods all concentrated in one spot. Some time during our shopping, she did go into a sensory overload but recovered. 

After the Expo, we meet up with Wanda G. for some lunch and of course had to rendezvous at the Paper Garden!

 Barbara, me, Wanda, Stephanie, and Maria

Maria at the yummy wall of paper goodness

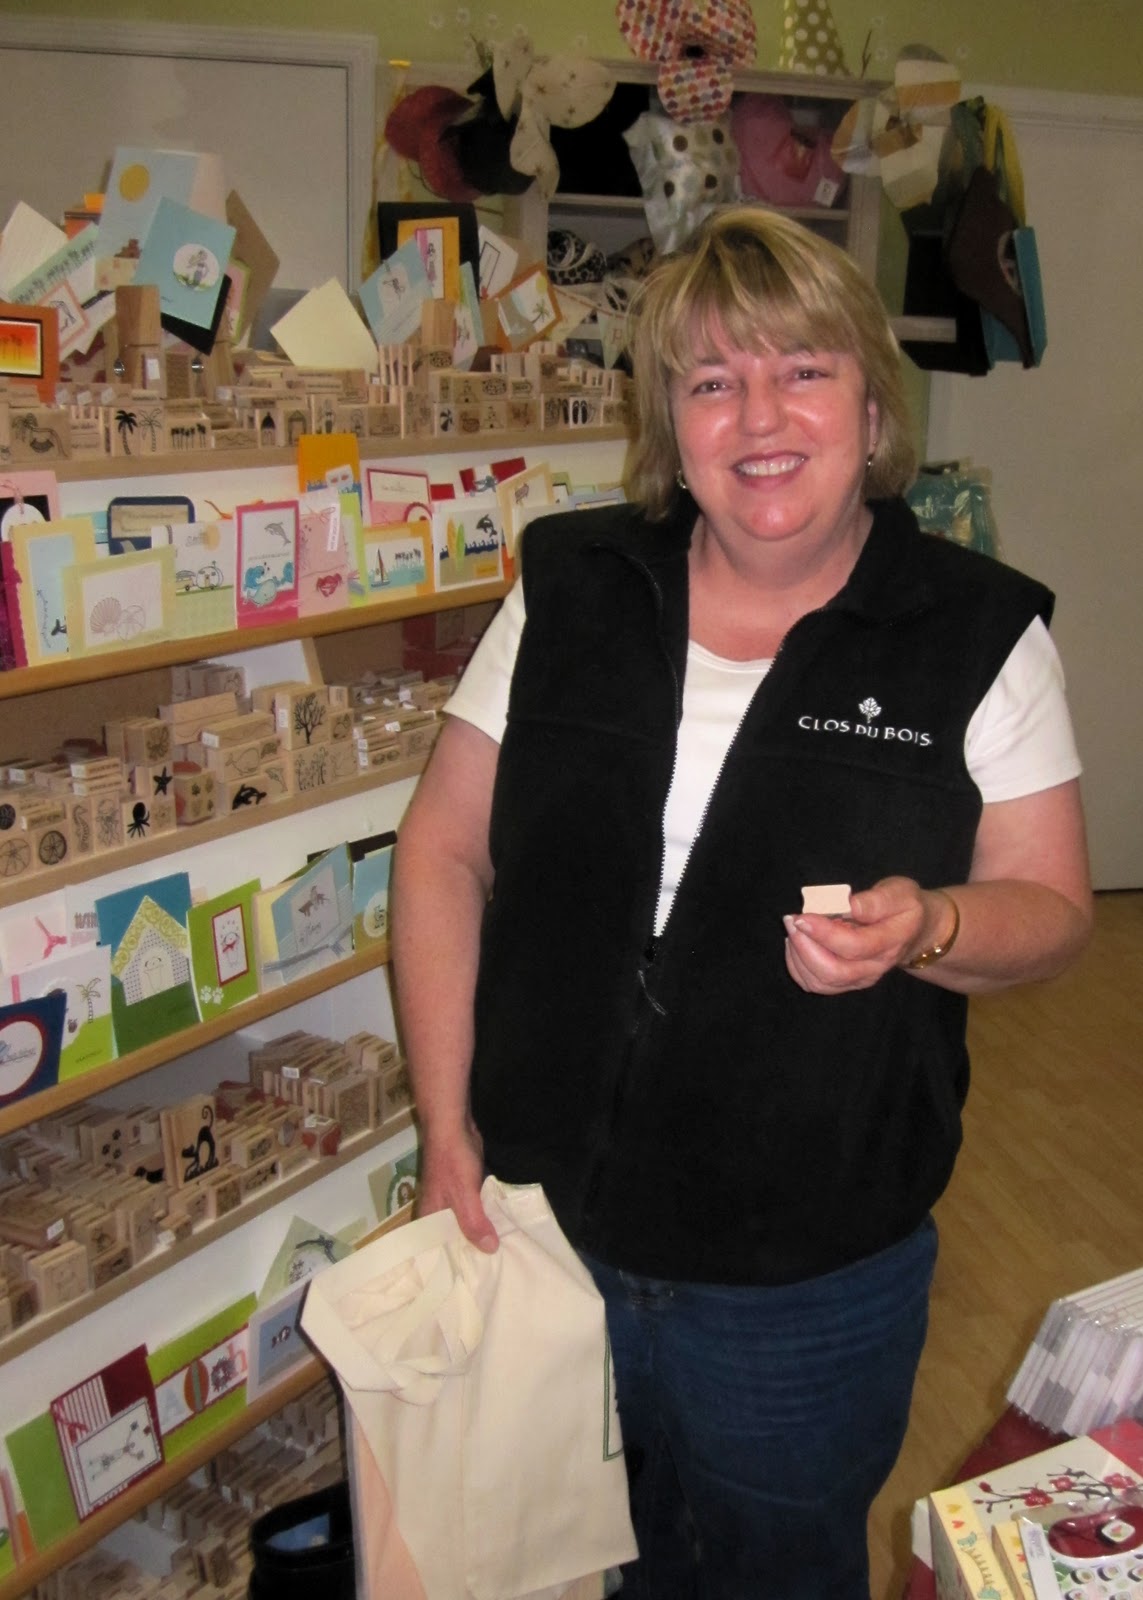
Barb checking out the plethora of stamps

I like this phrase Stephanie has up on the wall

I hoped you enjoyed my post for today! I haven't made a rag quilt tote for myself yet so that'll be my next sewing project probably not until after Christmas!


Friday, December 3, 2010

Yummy Cupcake Birthday Card for Barbara

Hi everyone!

I can't believe it's December already! Where has this year gone to? I hope you all had a fabulous Thanksgiving! My family and I surely did...we got to stay home and and enjoy a very relaxing holiday. I made gravy from turkey drippings for the first time and I didn't have any lumps whatsoever! That was one of the great highlights for me!

Well, I thought I would stop in and post something since it's been a few weeks...yikes!

I took my crafty friend, Barbara, out to lunch for her birthday last month at a local restaurant called diVine. I brought along a little gift and this card for her:


Isn't this image just the most adorable one you've ever seen? It's a Pure Innocence digital stamp by Heather Ellis.  She illustrates the cutest images and they are sooo fun to color! Many of her images are also available as clear stamps from My Favorite Things as well.  This cupcake one just got released as a stamp.

I started with a 5 1/2" square card base and using Bermuda Bay cardstock by Stampin' Up! I wrapped some Lemon Drop twine (doesn't that name sound yummy) by The Twinery all around the front of the card. I used a piece of SU! Melon Mambo cardstock and die cut the Scalloped Square die also from SU! and then ran it through the Swiss Dot (my all-time fave) Cuttlebug folder for texture. Then, I decided the scallops needed to have a more finished look, so I sponged some Melon Mambo ink all around the edges.

The image is colored in with my Copic markers. For the dress, I used a combo of Blue Green colors and pressed the brush tip end of a colorless blender marker  to add the polka dots. I held the tip down for just a few seconds to push some of the color out to achieve the polka dot effect.


I mounted the image on a solid kraft scallop circle just so it would get lost in all the pink background. I used a bunch of foam tape for added dimension of each layer. I stamped the birthday sentiment in Melon Mambo ink on a piece of pink cherry blossom cardstock by The Paper Garden and punched it out using the small scalloped oval punch. I LOVE this pattern cardstock sold exclusively from Stephanie's store! There are five other colors and if you want some, e-mail or call the store to place an order.


The cute birdie on top of the cupcake is from Paper Tales down in San Diego. This stamp is an exclusive one to their store. You may be thinking that it looks like it could be an A Muse image because it sorta is in a way. Nina Seven is an illustrator for A Muse and many of her illustrations are turned into stamps for A Muse and I believe she designed some images for Paper Tales as well.  

I stamped the image with Melon Mambo onto a larger scallop square of the cherry blossom cardstock. This ink coordinates so well it!


Finally, take a look at this dessert our server brought out for us to share!  It was yummy mud pie dripping with chocolate and caramel sauce...we didn't even finish it!

I had a great time lunching with Barb for her birthday and chatting the lunch hour away!

Thanks for stopping by and stay tuned shortly for another post of what present I made for Barb! This time won't have to wait a few weeks for it!

Thursday, October 21, 2010

Baby Shower Thank You Cards

A high school friend and his wife are expecting their first baby this month and I recently made them some thank you cards.


They are expecting a girl so of course I had to jump at the chance to go ALL pink...not that it's my favorite color or anything! I wanted to keep the card design as flat as possible so there wouldn't be any concern with having to use more than one postage for mailing.

I used kraft cardstock by Papertrey Ink as my card base.  It's a good heavy 100# cover weight perfect for one-layered cards. I stamped tiny hearts randomly on the card using Rouge Fluid Chalk.


For the main image, I stamped the crib by A Muse onto white cardstock and colored with my Copic markers. Then, I stamped the crib again onto Pink Gingham cardstock and cut out just the rectangle piece of bars. I used some light brown Copics to color the bars on the gingham piece to match the rest of the crib on white cardstock. The image is layered onto Leapfrog cardstock by Bazzill.  I used a Marvy Scalloped Circle punch and then punch holes into each scallop with a paper piercer. The 'Thank You' sentiment is by Stampin' Up! The pink and white twine is actually thin cotton yarn by Lily called The Original Sugar 'n Cream.  It's a bit thicker in weight compared to craft Baker's Twine.


I kept the inside of the card really simple by stamping this cute image by A Muse. I wanted leave enough  space for my friends to write their notes. 

I heard back from my friend's wife the other day and she totally loved them!  Yay!

Have a great rest of the week!  Halloween is just around the corner...can't believe how fast it's approaching! 

Monday, October 18, 2010

Birthday Fleece Blanket

Last week, we went to a birthday party for a girl who turned four years old. I wanted to make her a gift that would be fun yet practical. I decided to make a no-sew fleece blanket for her since the weather is beginning to get a little chillier in the evenings.


Isn't this such a fun and colorful pattern for a little girl? I really like it too!


Here's a pic of the front side and the flip side. I love how well both patterns go well with each other. I bought the fleece at JoAnn's and got a total of 3 yards (1 1/2 yards of each pattern) to make the blanket. I trimmed the ends off that showed the manufacturer name to get a clean edge. Then, I laid the fleece one on top of each other evenly. I cut a scrap piece of heavy cardstock into a 5 inch square and laid it down on each square end of the fabric on four corners and cut the square off. Be sure to use a sharp pair of scissors. With a long ruler, I cut one inch strips in width all the way around the outside of the fleece. Then, I took the strips and tied knots all the way around the perimeter to secure both pieces of fabric.

The whole process from start to finish took me about 2 1/2 hours to complete.  That size is perfect for a four year old...big enough as a blanket and when they get older, it will be great as a throw blanket. One of my friends, Maria, made me a no-sew fleece blanket and she used 2 yards of fabric and it's the perfect size for me!


Here's the gift bag I made for the blanket.  I took a kraft shopping bag and used 5 inch circle stickers from Paper Source to make polka dots on it.  I cut some of them in half for the top and bottom of the bag.   It's a quick and easy way to decorate when you are short on time!


This is a close up of the oversized gift tag I made for the bag. I used a piece of A Muse Kitchen Purple cardstock for the tag part and a large Cupcake background stamp from Stampin' Up!. I paper-pieced the paper cup using A Muse Gingham Grass cardstock. The alphabet letters are from a set by Kim Hughes.


Finally, this is the birthday card my son made for his friend. He used Prismacolor pencils as his coloring medium.  I believe he was practicing his circles and color blending!

Thanks for stopping by!

Thursday, September 16, 2010

Pretty Coach Purse

Oh, how yummy is this Coach Purse?!


Just look at how colorful the pretty patterns and texture are on this beauty! Pink, brown, green, metallic gold...those are sooo my colors! But alas, this gem is not mine...she belongs to my crafty girlfriend, Barbara. She has the coolest collection of stylish purses! One day when we were hanging out at her house, she showed me the purse and after drooling over it, I said that it was a total card inspiration. I told her she so had to make a card from it.


This is what Barb gave me for my birthday...how stunning is this card! I felt so honored that she took the time to craft this just for me! The picture doesn't do it any justice, I quickly snapped it with her purse when I was at her house. I love all the patterned paper Barb used to layer the different strips on the card! I could tell she had put a lot of thought in coordinating all the papers together like the purse.

 
I didn't notice the flower on the card was the cute flower charm chained on the purse until I compared both items side by side. I told Barb she better keep a close eye on her cutie Coach tote when I'm over to visit or else it might walk out the door with me...hee hee! Maybe that's why she made me the card!

Thanks a bunch Barb for the gorgeous card! I'm so lucky to have a close group of talented and generous crafty gals that I call my best friends!


Friday, August 20, 2010

Eclipse Wolf Card

I made a pair of thank you cards for my two best girlfriends when we went out to dinner and a movie to celebrate my belated birthday. We ate dinner at a Vietnamese restaurant across from the theater (very convenient) and of course saw the third Twilight movie, Eclipse. We loved it!


I made my own background on the card by repeatedly stamping the popcorn and tiny heart stamp in rows. I stamped all those bags of popcorn for one of my girlfriends who always has to buy some for every movie she sees no matter what!  Hee hee! Then, of course I used the wolf stamp because we root for Team Jacob!


I was testing out different ways on how to color Jacob...I mean the wolf...and I got a couple of different results from it.  I called this one the hairy wolf image.


I think I used about 3-4 different shades of brown Copic markers along with the colorless blender to achieve this effect.  I first colored the whole image with really light shade of beige. Then for each layer of hair, I took that beige shade and used the marker-to-marker tip technique for each darker shade of brown. I then did grass brush strokes by flicking the brush tip of my marker. After, I took an old textured kitchen rag soaked with some colorless blender and pounced it over the entire image. I held the rag down in 2-second increments.  I then went back at the end and added a few more brush strokes of "hair".


On the second card that I call the furry wolf, rather than laying down a base color, I just used the light beige marker and did the same marker-to-marker tip method to each of the darker brown shades and colored in small circles.  To finish it off, I used the soaked rag with color blender again.  


Here's the inside of the card.  I roughed up the edges of the recipe a bit to give it a more old and rusty feel like Bella's red truck. For dessert, my friend Barbara brought a little box of different cupcakes that she snuck into the movie theater in her purse. I couldn't even tell she stashed the box in there!

I hope you enjoyed checking out my thank you card creations. I wanted to capture each element from the wonderful time I had with my two girlfriends!

P.S. This card is also for the A Muse Lounge Challenge #19. This month's challenge is "Stick to the Pattern" where we are to create a card using any A Muse stamps or paper and making a pattern on it. Head on over to the Lounge to check out all the other entries!

Supplies:
Stamps: Wolf, Popcorn, Tiny Heart, Flatware, Vintage Truck, Frosted Cupcake, Tiny Gift (A Muse), From the Kitchen of (Stampin' Up!)
Paper: Kraft, Rustic Cream (Papertrey Ink), Poison Ivory Shimmer, Classic Crest Solar White (Neenah), Kiwi Kiss (Stampin' Up!)
Ink: Adirondack Espresso Dye (Ranger), Fluid Chalk Warm Red and Dark Lagoon (Clearsnap), Memento Rich Cocoa (Tsukineko)
Accessories: Daffodil Delight 1/4" grosgrain ribbon (Stampin' Up!), Fashion Cord Natural Polish Dark Thin Hemp (Cousin Corp. of America from Wal-Mart), Heart and Scallop Heart Punches (Marvy Uchida), Copic Markers and Pitch Black Atyou Spica Glitter Pen (.Too Corp.), Robin's Egg Pretty Pearls (A Muse), Stampin' Dimensionals foam dots (Stampin' Up!)


Monday, August 2, 2010

Golf Birthday Card

I celebrated my birthday at my sister's house this past weekend.  I had a great time visiting and eating all the yummy food my sister made!


I made this card for my BIL (his birthday is a day before mine) who is an avid golfer. All the stamps I used are from A Muse. I love how you can buy individual stamps and make a scene with them! I used a really light blue Copic marker (BG000) to color in the blue background.  One of these days I'll invest in getting the airbrush system! For the grass, I used the Martha Stewart grass border punch and layered a small strip of grass behind the front green piece of cardstock for more dimension.  


For the inside of the card, I used two green Copic Sketch markers and "flicked" the brush tip end of the markers to make grass blades. I made the golf ball by cutting out a circle and used the Cuttlebug Swiss Dots embossing folder to make the dimples in the ball.


When you open up the card, the ball kinds springs out at you!  I made the "spring" by punching a smaller circle and cutting around it in a spiral.  I have seen this technique in passing while blog surfing.

Thanks for swinging by!

Supplies:
Stamps: Golfer, Golf Shoe, Golf Clubs, Clouds, Sun, Happy Birthday (A Muse)
Ink: Memento Tuxedo Black (Tsukineko), Prussian Blue Fluid Chalk Ink (Clearsnap), Summer Sunrise (Papertrey Ink), Wild Wasabi (Stampin' Up!)
Paper: Kraft cardstock (PTI), Classic Crest Solar White (Neenah), Leapfrog (Bazzill)
Accessories: Dong-A Popcorn White Craft Pen (from JetPens), Heat-It Craft Tool (Ranger), Copic Markers, White Pretty Pearls (A Muse), Assorted Atyou Spica Glitter Pens (.Too Corp), Martha Stewart Grass Border Punch (EK Success), Cuttlebug Swiss Dots Embossing Folder (Provo Craft), CM Circle Cutting System (Creative Memories), Large Oval and Scalloped Oval punches (Stampin' Up!)


Thursday, July 22, 2010

Butterfly Clear Card

I made use of some supplies I've had in my stash that hardly ever see the light of day when I had this card in mind.


I don't usually make these type of cards too often because clear plastic tends to be very finicky to work with and you have to make sure you use the right kind of ink if you plan to stamp on it. Also, it helps a great deal if you're in a fairly good mood when you decide to make a clear card!

I started by scoring a piece of clear plastic with my Scor-Pal a few times and folding it on the crease.  Then, I stamped the butterfly background using StazOn Ink in Blush Pink.  It's important to keep in mind that the surface of the plastic is slick, so you need to make sure you lift the stamp straight up.  Otherwise, you will smear the image and you won't be very happy about it!

I used a glue pad to stamp the larger butterfly image for the centerpiece and sprinkled Bronze Splendor glitter over the whole butterfly.  Oh so sparkly! I then stamped the "Hello" in New Leaf ink and matted it with pink shimmer cardstock. I also used some foam dots to pop the image up from the card front.

When working with a clear card, any kind of adhesive you use will show up on the back side.  I used a second piece of pink shimmer cardstock the same size as the mat and adhered it directly behind the card front on the inside.  For the inside card base, I used a larger piece of lime green shimmer cardstock to frame the front image when the card is closed.  I used a smaller piece of Poison Ivory shimmer cardstock for room to write a note inside.

Lastly, I tied brown hemp twine around the front of the card a few times to finish off the card.  I love how this card turned out!  I'll have to make more of these cards since it didn't frustrate me too much!

Photo courtesy of Wanda G.

This pretty Marigold card made by my crafty sistah Wanda inspired me to use my square scalloped die from Stampin' Up.  I love the yellow ink on the marigold and the black gingham cardstock she used on the card.  And that sheer yellow ribbon...how cheery is that?! Check out Wanda's blog for more details on this card and to see her other wonderful creations!


My other inspiration also stems from one of the pretty flower cards I made in Julie Ebersole's class during A-Muse-A-Palooza at the Paper Garden in Sacramento.  I love the huge Marigold outline stamped with white StazOn ink on the clear plastic.  It adds so much interest to the whole card!  It almost looks like etched glass!  It's hard to tell but the orange-reddish solid Marigold has glitter in the center.  It's so sparkly in person!

I hope you enjoyed my creation and seeing the other two cards that inspired my Butterfly card!

Thanks for stopping in!
Supplies:
Stamps: Flutterby FlockFlutterbyHello FL (A Muse)


Accessories: Bronze Splendor glitter (Taylored Expressions), The Essential Glue Pad (Tsukineko), Essentials by Ellen Crystal Clear Plastic (Ellen Hutson), Fashion Cord Natural Polished Dark Thin Hemp (Cousin Corp. of America) from Wal-Mart


Tuesday, July 20, 2010

Taylored Expressions Blog Hop!

Thanks for stopping by and welcome to the blog hop hosted by Taylored Expressions! Our mission was to make a card using any TE stamp set released prior to May 2010. I chose to use "Sewing Cuppie" from the Crafty Cuppie set.


I started off attempting to make a card but for some reason the design wasn't coming together as I had envisioned. I'm sure that never happens to anyone else! I decided I would make a sewing notebook for myself since I'm a beginner to that craft. I thought that jotting down all the helpful tips I find on various websites would be a good reference to have in one place. I recently bought a Janome Sew Mini as my first sewing machine.  It's so cute and lightweight!  It's about the size of a 8 1/2 by 11 sheet of cardstock!

I took a piece of Kraft cardstock and made my own background by alternately stamping the sewing basket image from Crafty Expressions and Tiny Heart from A Muse. Then, I adhered it to an 8 x 10 1/2 notebook and put a strip of Enchanted Evening grosgrain ribbon from Papertrey Ink along the side. 


For the centerpiece of the notebook, I used Real Red cardstock from Stampin' Up! for the base and a piece of patterned paper from the Junebug collection by Basic Grey. Love the colors and floral designs! The Enchanted Evening polka dot satin ribbon is by Papertrey Ink.


I adhered Sewing Cuppie on Real Red cardstock to give it a double matted look against the patterned paper.  I used my Copic markers to color my image and a really light blue green Copic for the background image. There was a sheet of patterned paper from the Junebug collection that looked like a quilt design so I paper-pieced it to the fabric that Cuppie was sewing. To make the sparkly frame, I put strips of 1/8" Scor-Tape from Scor-Pal on all four sides and sprinkled TE Bronze Splendor glitter on the tape.  I love how sparkly it turned out! 

I hope you enjoyed checking out my sewing notebook and have fun seeing all the other fabulous creations!

Wednesday, July 7, 2010

Lovebirds Anniversary Card

I'm experiencing a very busy schedule at home base this week...not much time to be crafty!  Here's a card I made for my sister and her husband.  They recently celebrated their wedding anniversary.


I kept my card clean and simple to make the two cute lovebirds the main focal point.  Aren't they just an adorable pair?  The image is from Kim Hughes's stamp set called "The Birds and the Bees" by Cornish Heritage Farms.  The woodgrain cardstock is from A Muse and I used a Chocolate Spica glitter pen to add sparkle in between the lines. The polka dot Bermuda Bay grosgrain ribbon is retired from Stampin' Up.


I stamped and colored the birds twice with my Copics, cut out the second ones and used foam dots to pop up the image for added dimension.


I made the inside of the card a pop up one for the punched out heart and scalloped heart.  I used a strip of red cardstock and stamped the sentiment on it for a banner look.


Here's a full pic of the inside.  I love the two fish on the bottom left with the sentiment!  Both are by A Muse.

On a side note, I recently found out that Cornish Heritage Farms is going out of business so if you like any of Kim Hughes' stamp sets, now is the time to stock up!  Check out the CHF website and read the story on their blog.  CHF will eventually mark their remaining inventory down before shutting their doors but if you can't wait, Ellen Hutson is liquidating the rest of her CHF stock right now at 40% off in her online store.  I so love all of Kim Hughes' illustrations, I'm sad to see her stamps discontinued so I'm stocking up myself on sets that I've been wanting forever.  Check out her blog for great inspiration!

Well, gotta get back to my chores!  I'll add my supply list later on when I get a chance.  Thanks for looking!

Friday, July 2, 2010

Ka-Pow! Sassy Penguin Card

I wanted to make a card for Barb (one of my good crafty buddies) after we went shopping in Berkeley one weekend. Other than the big box craft stores in our area, we don't live near any good local scrapbook/stamp stores. Sadly, they've all closed down through the years. So we have to trek a little over an hour to find good craft supplies. It's always good to shop at a local scrapbook/stamp store (LSS) if you live near one you love. They need all your support!

I made a resolution this year to use the stuff I buy and not hoard it so much. I'm sure that's a familiar story for some of you!


I tend to get a little overwhelmed sometimes when I make scenic cards.  I think I over do it with stuff.  But in this case, I wanted to use my new goodies and left my comfort zone. It's good to do that every once in a while.

I found a sticker sheet of fuzzy penguins wearing pink bandanas doing martial arts moves from Paper Source (sooo love that store). I cut a strip of the Dear Lizzy 12x12 heart fabric sheet I got from Scrapbook Territory. The whole sheet is adhesive-backed and very easy to work with.  Then, Barb and I stumbled into an eclectic store called Castle in the AirI found some really nice green floral crepe paper I punched out with my Martha Stewart grass border punch. That paper was so much nicer to work with than the streamer-types you find in the party section at the stores.


I've been making more of an effort to make the insides of my cards more decorative and this cloud paper did the trick! I absolutely love, love, love this patterned cardstock from A Muse! You can use it for so many things! The airplane skywriter is also from A Muse. The postal cancel stamp is from Paper Source and I used a mini date stamp from Office Max in the middle.   

The only thing I didn't like on the card was the butterfly trail. Next time, I think I'll use a pencil first before committing to permanent ink.  You live and learn!

Have a super day and thanks for stopping by!

Supplies:
Stamps: Clouds, Sun, Mini Flower, Tiny Daisy, Tiny Heart, Hello, Skywriter (A Muse), Do Something Creative (Paper Source), Mini date stamp (Office Max)
Ink: Memento Tuxedo Black (Tsukineko), Assorted colors of Colorbox Fluid Chalk (Clearsnap), 
Paper: Dear Lizzy Morning Melody Fabric (American Crafts), Clouds, Petite Gingham Yellow (A Muse), Thunder (Bazzill), Pink Lemonade (Elzybells)
Accessories: Green Crepe Paper, Apple Green 1/4" grosgrain ribbon (Schiff), 1/2" Round-It-All (Zutter), Martha Stewart Grass Border Punch (EK Success), Butterfly Square Punch (Punch Bunch), Small and Large Oval Punches (Stampin' Up!), Olive and Pink Atyou Spica Glitter Pen, Copic Multiliner, Assorted Copic Markers (.Too Corp), Paper Cutter (Fiskars)

LinkWithin

Related Posts with Thumbnails