Pages

Tuesday, August 24, 2010

Ball Game Cuppie in San Francisco

Last weekend, my family and I went to a San Francisco Giants ball game against the San Diego Padres at AT&T Park in San Francisco. We had such a blast that day! One of the drilling companies that my husband's work does business with paid for all of us to get in. When we arrived, we all got a Giants ball cap, company t-shirt, and all the kids were given some pocket change for snacks and such. What a treat for all of us. We also arrived in time for all the kids to get a giveaway bright orange baseball shirt!

I thought I would make the drilling company a card so my husband and his co-workers could sign thanking them for their generosity.


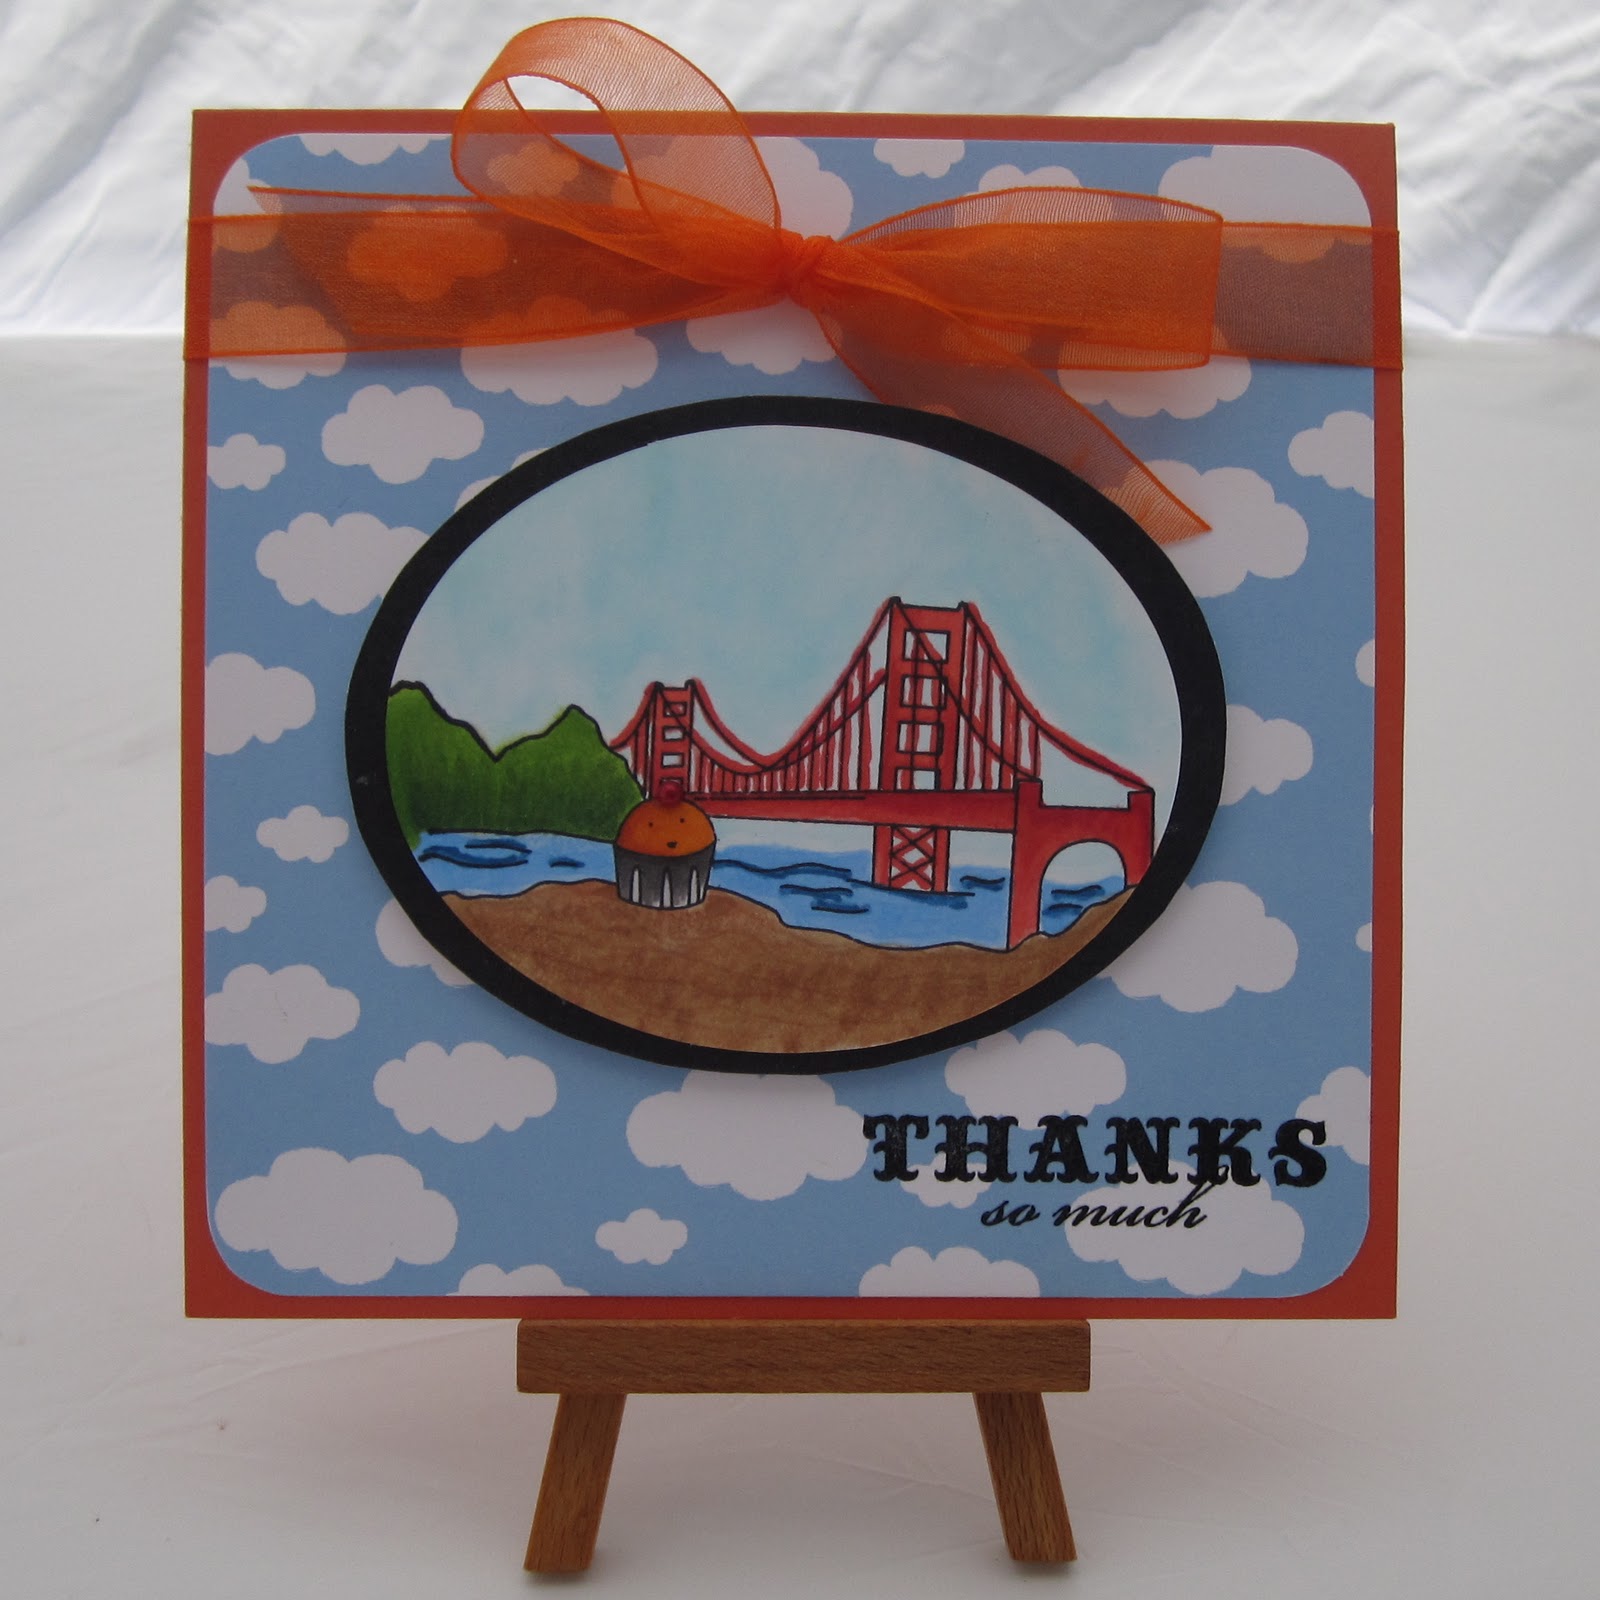
Of course I had to use Destination Cuppie in San Francisco from Taylored Expressions for the main image. I also incorporated orange and black for the Giants team colors.  I used the Clouds paper from A Muse for the background so it wouldn't look to Halloween-y.


I colored this image with my Copic markers. For the sandy area, I used a kitchen rag soaked in colorless blender to give it a more sand-like texture.


I randomly stamped baseballs all over the inside of the card in Tangerine Tango by Stampin' Up!.


For the baseball, I punched out a circle from white cardstock and took a red marker to draw the stitching of the ball. Then, I stamped the sentiment by A Muse in the middle. I then punched out a smaller circle, cut it out in a spiral design, and attached one small end to the card and the other to the baseball for a 3D effect.

Thanks Pitcher Drilling for such a fun and fabulous day!

Supplies:
Stamps: Destination San Francisco (Taylored Expressions), Thanks so much (Impress Rubber Stamps), Life is good MA (A Muse), Baseball from Kim Hughes Boy stamp set (Cornish Heritage Farms)
Paper: Tangerine Tango (Stampin' Up!), Clouds & Black Shimmer Couture (A Muse), Classic Crest Solar White (Neenah)
Ink: Brilliance Graphite Black, Memento Tuxedo Black (Tsukineko), Tangerine Tango (Stampin' Up!)
Accessories: Copic markers, Sand Atyou Spica Glitter pen (.Too Corp.), Clear embossing powder (Stampin' Up!), Orange 5/8" sheer organza ribbon, Red Zig Writer


Sunday, August 22, 2010

Friends Forever Patchwork Card

I thought I'd try my hand at making a patchwork background using the Top Note Bigz Die from Stampin' Up!. I used various A Muse patterned cardstock to make a thank you card for my crafty girlfriend Wanda G. for all the birthday goodies box she sent me.

Photo taken by Wanda G.

For the patchwork part, I followed a blog post by Chris Simon on how to make the quilted looking background and it turned out perfect! I took a brown liner pen to make the faux stitching. I kept the layout really simple since the patchwork speaks for itself. I used the stamp that Wanda had given me for my birthday and colored the girls to look like us.

I so love how the card turned out and so did Wanda...yay!  I'll have to make more of these types of cards...it's so easy!

Have a great day!

P.S. Another card for the A Muse Lounge Challenge #19. This month's challenge is "Stick to the Pattern" where we are to create a card using any A Muse stamps or paper and making a pattern on it. Head on over to the Lounge to check out all the other entries!

Supplies:
Stamps: Holding Hands by Elzybells Art Stamps (A Muse) *Stamp no longer available at A Muse but Paper Garden in Sacramento may still have some*
Paper: Petite Gingham, Madeira, Kitchen, Clouds (A Muse), Chocolate (Memory Box Co.), Classic Crest Solar White (Neenah), Pink Bazzill cardstock (Bazzill)
Ink: Memento Tuxedo Black (Tsukineko)
Accessories: Aqua 3/8" grosgrain ribbon (Ribbons and Bows Oh My!), Copic markers (.Too Corp.), Sepia 0.5 Liner pen (Sakura), Circle and Scallop Circle Punches (Marvy Uchida), Top Note Bigz Die, Stampin' Dimensionals (Stampin' Up!)

Friday, August 20, 2010

Eclipse Wolf Card

I made a pair of thank you cards for my two best girlfriends when we went out to dinner and a movie to celebrate my belated birthday. We ate dinner at a Vietnamese restaurant across from the theater (very convenient) and of course saw the third Twilight movie, Eclipse. We loved it!


I made my own background on the card by repeatedly stamping the popcorn and tiny heart stamp in rows. I stamped all those bags of popcorn for one of my girlfriends who always has to buy some for every movie she sees no matter what!  Hee hee! Then, of course I used the wolf stamp because we root for Team Jacob!


I was testing out different ways on how to color Jacob...I mean the wolf...and I got a couple of different results from it.  I called this one the hairy wolf image.


I think I used about 3-4 different shades of brown Copic markers along with the colorless blender to achieve this effect.  I first colored the whole image with really light shade of beige. Then for each layer of hair, I took that beige shade and used the marker-to-marker tip technique for each darker shade of brown. I then did grass brush strokes by flicking the brush tip of my marker. After, I took an old textured kitchen rag soaked with some colorless blender and pounced it over the entire image. I held the rag down in 2-second increments.  I then went back at the end and added a few more brush strokes of "hair".


On the second card that I call the furry wolf, rather than laying down a base color, I just used the light beige marker and did the same marker-to-marker tip method to each of the darker brown shades and colored in small circles.  To finish it off, I used the soaked rag with color blender again.  


Here's the inside of the card.  I roughed up the edges of the recipe a bit to give it a more old and rusty feel like Bella's red truck. For dessert, my friend Barbara brought a little box of different cupcakes that she snuck into the movie theater in her purse. I couldn't even tell she stashed the box in there!

I hope you enjoyed checking out my thank you card creations. I wanted to capture each element from the wonderful time I had with my two girlfriends!

P.S. This card is also for the A Muse Lounge Challenge #19. This month's challenge is "Stick to the Pattern" where we are to create a card using any A Muse stamps or paper and making a pattern on it. Head on over to the Lounge to check out all the other entries!

Supplies:
Stamps: Wolf, Popcorn, Tiny Heart, Flatware, Vintage Truck, Frosted Cupcake, Tiny Gift (A Muse), From the Kitchen of (Stampin' Up!)
Paper: Kraft, Rustic Cream (Papertrey Ink), Poison Ivory Shimmer, Classic Crest Solar White (Neenah), Kiwi Kiss (Stampin' Up!)
Ink: Adirondack Espresso Dye (Ranger), Fluid Chalk Warm Red and Dark Lagoon (Clearsnap), Memento Rich Cocoa (Tsukineko)
Accessories: Daffodil Delight 1/4" grosgrain ribbon (Stampin' Up!), Fashion Cord Natural Polish Dark Thin Hemp (Cousin Corp. of America from Wal-Mart), Heart and Scallop Heart Punches (Marvy Uchida), Copic Markers and Pitch Black Atyou Spica Glitter Pen (.Too Corp.), Robin's Egg Pretty Pearls (A Muse), Stampin' Dimensionals foam dots (Stampin' Up!)


Thursday, August 19, 2010

Memory Box Nutty Squirrel Card

I busted out all my Prismacolor pencils instead of my Copic markers to color this cute squirrel image from Memory Box Co.  I've been trying to practice pencil coloring while it's still fresh in my mind from taking Dave Brethauer's class last weekend.


I've had this stamp for a while now but I was stuck on how to go about coloring it the way I envisioned. But after Dave's class, I applied all the techniques I learned and I'm so pleased with how it turned out! Yippeee! I kept the layout of this card really simple because I didn't want it to distract from the main image.


In addition to the squirrel stamp, you also get what I call a little "bonus" stamp on the side of the wood block of a little acorn for coordinating with the main image. It's great for making your own background paper or to decorate the envelope with. Many of the stamps that Dave designs have a little stamp on the end. It makes you feel like you are getting a 2 for 1 deal!


I used four different colored pencils for this cutie squirrel. I started very lightly by laying down a beige color over the whole squirrel.  Then, I used a dark raspberry on the back and tail part and added a medium chestnut color over that.  For the lighter areas, I blended everything together with a yellow ochre pencil.  I really like the results!  That is how I totally wanted my squirrel to look...love when that happens!

I really love the apron on the squirrel...so adorable!  You can choose to either color it in or paper piece it since it's an outline of the apron, it's very versatile!  I used some pattern paper from the Gossamer collection from Memory Box for the apron and background. I also matted the card with some shimmery green cardstock and finished off with some rich chocolate satin ribbon.

I like how this card has a nature and home-y...I'll have to make some more!

Thanks for looking and have a great day!

Supplies:
Stamps: Nutty Squirrel (Memory Box Co.), Hello (A Muse)
Ink: Fluid Chalk Rose Coral (Clearsnap), Adirondack Espresso (Ranger)
Paper: Gossamer pattern, Chocolate (Memory Box Co.), Shimmer Couture Lime (A Muse)
Accessories: 5/8" Chocolate satin ribbon (Ribbons and Bows Oh My!), Super Jumbo Circle and Mega Scallop Circle punches (Marvy Uchida), Clear Atyou Spica Glitter pen (.Too Corp.), Black Raspberry, Chestnut, Beige, Yellow Ochre Prismacolor Pencils (Sanford)

Tuesday, August 17, 2010

Super fun day with Dave Brethauer of Memory Box Co.!

Oh my goodness...I had such a great day at Paper Garden on Saturday taking a colored pencil class with Dave Brethauer (owner of Memory Box) and with my friend Wanda G! Although we have separately taken this class with Dave in the past, we always learn some new technique in refining our coloring skills.

Wanda, Dave and me!

If you ever get the opportunity to take any of Dave's classes, I highly recommend it!  He has so much patience and always stops at each table to demo each technique first hand. Dave travels to various stamp stores all over the States and shares his talent with all who want to learn about colored pencils and water coloring techniques.

Aren't those three birds wearing hats the cutest?!

I took this pic when I was supposed to be paying attention...oops!

These are the five cards we made during class that Wanda colored and took a pic of.

Wanda snuck a pic of me concentrating on coloring the hats on the birds. We used Prismacolor pencils. Oooh...the coolest technique we learned was to take the small end of a stylus (dry debossing) and making designs like stripes or dots on the hats before lightly coloring over the area. We thought it was so genius!

Here's Wanda goofin' off before class started. She's gonna give me a hard time for showing this!

Pic courtesy of Wanda G.
Here are some more card samples from the other class that Dave taught. I love the polar bear in the snow globe easel card...so sparkly! 

After class, Wanda and I went to lunch at a restaurant called Lemongrass in Sacramento and had such a yummy meal!  We saved room for dessert of course and we each had the most delicious coconut ice cream topped with chocolate sauce (for me) and caramel sauce (for Wanda). Oh, it was soooo good!

I hope you enjoyed checking out all the pics of my fun crafting day!

Tuesday, August 3, 2010

One-Layer Wednesday 14: Square Outlines

It's another weekly card challenge by Susan Raihala on her blog, Simplicity. We were to make a one-layer square card using any outline image stamp and keeping embellishments to a minimum. Here's the card I submitted:


Oy, as you can see, my card is rectangular. I got so wrapped up in making sure I was using outline stamps that I forgot to make a square card...big oops!  Oh well!

First, I stamped the tree branch from the Landing Pad by Kim Hughes directly on the white shimmery cardstock and colored in the leaves with Copic markers. Then, I stamped the branch again on a piece of Birch Wood pattern cardstock from A Muse and just cut the branch part of the image out. The woodgrain was a contrasting white but I used a couple of brown colored Copics to darken it.

Isn't the Tweet Bird from Memory Box so adorable?  I stamped the bird onto a piece of Gossamer pattern paper also by Memory Box and cut it out sans the legs.

I finished off the card by stamping the "Hello" sentiment by A Muse with Adirondack Espresso ink. I love how elegant that font makes the card!

Have a great day and be sure to check out all the other creations for this challenge on the Simplicity blog!

Recipe Binder Vol. 1

I made this recipe binder for my sister to help her organize all the recipes she likes to print out from her computer. Before, she used to keep the print outs stacked in two filing folders.


I'm very pleased with how it turned out!  It took me forever to come up with this design that I thought my sister would be happy with.  She likes clean lines and nothing too busy with graphics and such. The yellow and brown pattern paper is from Craft Fair by American Crafts...love their stuff! The green polka dot strip on the side is by A Muse. The cute stamp images is a stamp set by Kim Hughes. Oh and that yummy bowl of guacamole was made from scratch by sister for my birthday weekend!


For the spine of the recipe binder, I used the Stitched Uppercase Alphabet stamp set from A Muse. The letters in the set are clear so it was really easy to place each letter where I wanted them.


I used some plastic tabbed dividers with pockets so the recipes could be organized by category.


Of course I have to show a pic of the yummy food my sister made for my birthday celebration! We had steak and shrimp fajitas and salad Nicoise (per my request) from recipes in the binder. I pretty much ate my way through the whole weekend!


Last, but not least, the yummy chocolate cake with fudgy chocolate frosting! It was super yummy!

Monday, August 2, 2010

Golf Birthday Card

I celebrated my birthday at my sister's house this past weekend.  I had a great time visiting and eating all the yummy food my sister made!


I made this card for my BIL (his birthday is a day before mine) who is an avid golfer. All the stamps I used are from A Muse. I love how you can buy individual stamps and make a scene with them! I used a really light blue Copic marker (BG000) to color in the blue background.  One of these days I'll invest in getting the airbrush system! For the grass, I used the Martha Stewart grass border punch and layered a small strip of grass behind the front green piece of cardstock for more dimension.  


For the inside of the card, I used two green Copic Sketch markers and "flicked" the brush tip end of the markers to make grass blades. I made the golf ball by cutting out a circle and used the Cuttlebug Swiss Dots embossing folder to make the dimples in the ball.


When you open up the card, the ball kinds springs out at you!  I made the "spring" by punching a smaller circle and cutting around it in a spiral.  I have seen this technique in passing while blog surfing.

Thanks for swinging by!

Supplies:
Stamps: Golfer, Golf Shoe, Golf Clubs, Clouds, Sun, Happy Birthday (A Muse)
Ink: Memento Tuxedo Black (Tsukineko), Prussian Blue Fluid Chalk Ink (Clearsnap), Summer Sunrise (Papertrey Ink), Wild Wasabi (Stampin' Up!)
Paper: Kraft cardstock (PTI), Classic Crest Solar White (Neenah), Leapfrog (Bazzill)
Accessories: Dong-A Popcorn White Craft Pen (from JetPens), Heat-It Craft Tool (Ranger), Copic Markers, White Pretty Pearls (A Muse), Assorted Atyou Spica Glitter Pens (.Too Corp), Martha Stewart Grass Border Punch (EK Success), Cuttlebug Swiss Dots Embossing Folder (Provo Craft), CM Circle Cutting System (Creative Memories), Large Oval and Scalloped Oval punches (Stampin' Up!)


LinkWithin

Related Posts with Thumbnails